
Happy Monday! And, yep. I have some beans to spill.
I wish I had something exciting to tell you, but you’ll just have to settle for card making beans. lol! Have you ever had an idea for a card and no matter how hard you tried to make it work, it just wouldn’t? That is what happened with the card I am sharing today. Ultimately, the card turned out fine…just not what I originally was planning.
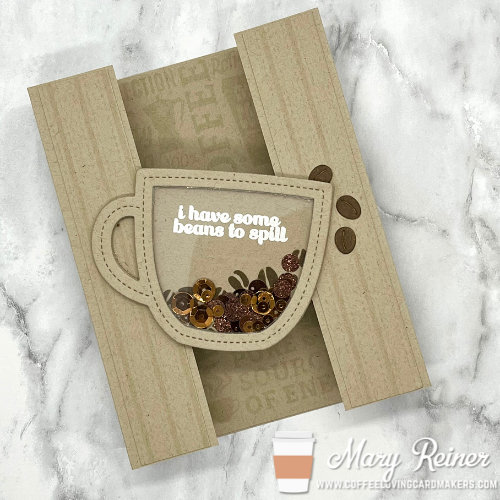
I have been enjoying making bridge cards lately, so I decided to step it up and make a shaker/bridge card. Here’s the truth: I don’t have good luck making shakers. But I was excited to add a small shaker element to my bridge card.

Here’a how I made the card:
To create my card, I started with a piece of Neenah 100# Desert Storm card stock that measured 5 1/2″ x 10 3/4″. To acheive the pop up effect, I scored my card stock at 1 1/4″, 2 1/4″ and 3 1/4″. Then, I turned the card stock 180 degrees, and added score lines in the same spots. Next, I accordian folded (or zig-zag folded) on the score lines. Using a bone folder is very beneficial to acheive the crisp folds. Once folded, the card measures 4 1/4″ x 5 1/2″ and will fit in a standard A2 envelope.
I cut 2 pieces of Desert Storm card stock, slightly smaller than 4 1/4 x 5 1/2″ and stamped one panel with the “Our Finest Selection” background stamp from Picket Fence Studios with GinaK Amalgam ink. The second panel was stamped with the same ink, but this time I used the Simon Says Stamps “Ticking” background cling stamp. I wanted a very subtle backround, so using the original Amalgam ink because it is a very light, neutral ink. I cut that panel into 1″ strips. I adhered the large stamped panel to the back portion of my bridge card and the strips to the front, two panels. I had some leftover ticking strips that I will save for another card.
For the shaker element, I used the Lawn Fawn Outside In Stitched Mug and the Stitched Mug Frame. I cut four of the frame from Desert Storm card stock to build up the edges of my shaker. The base of the shaker was cut from Desert Storm as well. I stenciled coffee beans from A Colorful Life Designs “Coffee Stream” Stencil in Catherine Pooler Macchiato Ink. I adhered the frame to the mug base with liquid glue.
Here’s where things went wrong. I wanted to emboss the white sentiment onto the the front acetate on the shaker. I tried at least four times and did not like the results. I ended up embossing the sentiment directly onto the mug (which meant I needed to remake the whole shaker element) and then adhered the frame and added the shaker bits. Then, I used my anti-static tool around the frame and adhered the acetate top with a single die cut frame to finish it off.

Lastly, I adhered the shaker to the bridge card being careful to only apply glue to the areas that would be touching the front panels. I also added a few die cut coffee beans to spill out of the mug.

So I spilled the beans on my card that took way too long to create! However, I do really like how it turned out!
Hugs and mugs,
Mary


Leave a reply to Mary Reiner Cancel reply