
We’re so excited to welcome our Guest Designer – Kristi H!
Hello, crafters. My name is Kristi and I’m thrilled to be a guest designer this month for the Coffee Loving Papercrafters Blog! Huge thanks to Amy for the invite. I’ve retired from the workforce, but am often working on being a grandma, a crafter, and a friend of the library. I’ve been crafting forever, but was introduced to card making through wonderful designers like Lisa Spangler and Agnieszka Mayszek via their step-by-step tutorials. I usually find myself drawn to scene building, but enjoy trying out other things, including mixed media and watercolor. Cardmaking is my creative release, and I try to do something creative every day, even if it’s just die-cutting a few pieces. You can find my creations on Instagram where my handle is @kristi_created

If you’re here, you probably love coffee like I do. Sadly, I’m only allowed one cup per day, and the doc said the carafe can’t be used as a cup, so I try to savor every sip! I’ve amassed a nice collection of coffee, tea, and cocoa-related products since discovering Amy and the Caffeinated Christmas Card Challenge, which has given me a lovely monthly goal to work toward. I hope you get to do something a little crafty today.
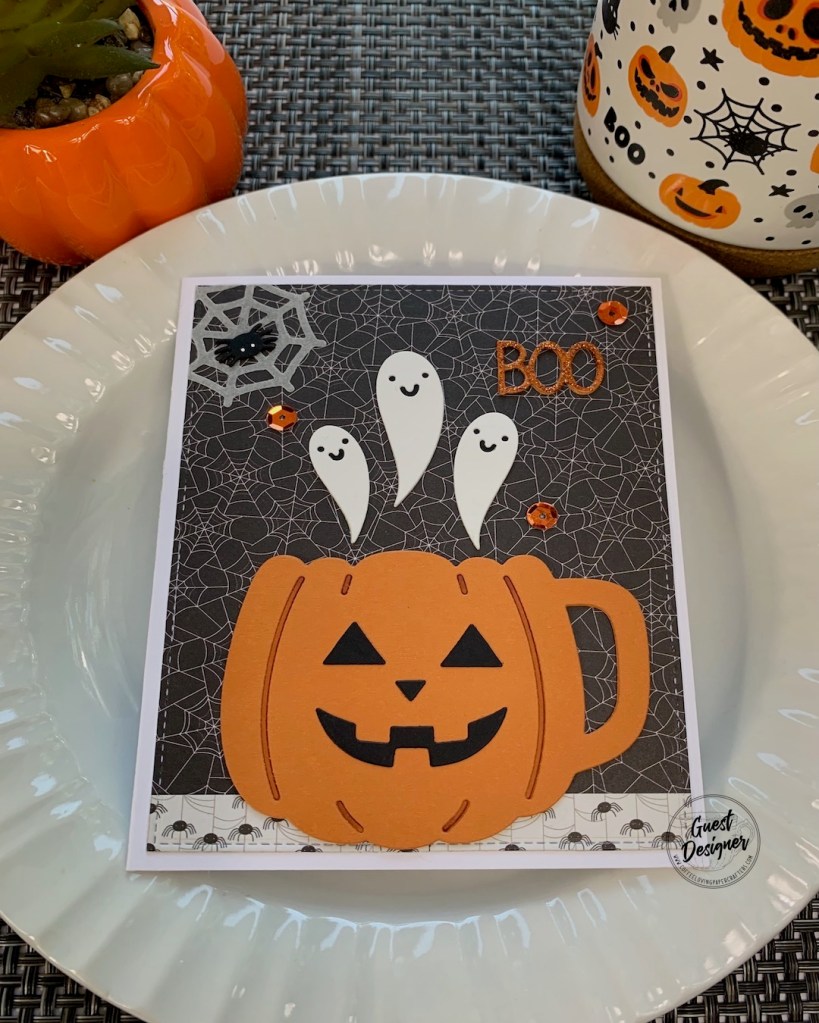
For this project, and since it’s October, I decided to focus on a die that I’ve had in my stash for a while, but never used – the pumpkin mug from super sponsor Ellen Hutson. You can still get some of her products through her Amazon storefront.

Products:
- Accent Opaque Digital Cover Smooth Cardstock base
- Orange, Black, and White cardstock from my stash (probably MFT)
- Essentials by Ellen – Pumpkin Mug by Julie EEDIEJ-1129-22
- My Favorite Things – Blueprints
- Pretty Pink Posh – Ghost Holder
- Pretty Pink Posh – Halloween Holder Additions
- Hero Arts – Classic Vellum
- Martha Stewart – Sequins
- Bearly Art Precision Craft Glue
- Hampton Art Glitter Glue
- Sakura White Gelly Roll 10 Pen
Die-cutting is my favorite, so I went there to create my little scene. I made sure I had my Bearly Art glue handy, as I always use liquid glue to adhere my card layers.
I started by cutting out the pumpkin mug twice from orange. This die cuts out the ridges in the pumpkin mug, so on one of my diecuts, I used a piece of Scotch tape on the back to hold those in place and then ran a Copic E99 over them on the front side. I layered the other pumpkin mug on top and glued it down.
Next, I cut the jack-o-lantern face from black cardstock and glued it onto my pumpkin.
I cut the ghosts from white and removed the eye and mouth pieces, adhering a tiny scrap of black cardstock to the back of each ghost.

At this point, I went to my stash to pick some patterned paper. I have a rather large assortment of Halloween and Fall paper pads, so I knew I’d find something I wanted to use. Sometimes, I pick the patterned paper first, so if that’s your method, go for it! I chose my paper from the American Crafts Spooky Boo paper pad and then dug around for a sentiment and came up with this one from the Pretty Pink Posh Ghost Holder dies.
I love a stitched border panel, so pulled out a stitched rectangle die from an MFT Blueprints set to cut my background panel, and since I prefer a grounding element of some kind, I picked a tear strip in the Spooky Boo pad that I thought looked fun with my background paper. I glued that in place before I cut the panel, so that I’d have a nice stitch all the way around.
From there, I started laying out my design and the upper left corner looked a little empty, so a spider seemed like the right element. This one, along with the web, is from the Pretty Pink Posh Halloween Holder Additions. The web is cut from vellum, and I applied glue to the back with a sponge dobber. Once the web was adhered, I glued my panel down on my card base. Then, when I was contemplating the layout, I decided that I needed a little more dimension on the mug and ghosts, so added a layer to each. Thinking this project needed a little pizzaz, I added some glitter glue to my diecut sentiment and pulled a few sequins to finish it off. Last, but not least, I added some eyes to the spider with my Gelly Roll pen.
I’m happy with how this turned out, and I hope it provides you with a little inspiration. Thank you for taking the time to read about my project, and Happy Halloween!
For more inspiration make sure you stop by Kristi’s instagram.


Leave a Reply – please note that comments are moderated